You pulled the wings at exactly 165°F. The skin looked promising: glossy, mahogany, a little tacky from the sauce. Then you bit in and hit a rubbery sheath, which slid off the meat in one piece. The smoke was there, but the texture ruined it. If that scene is familiar, you’re not alone. Most wing recipes treat them like miniature chicken breasts, chasing a safe internal temperature while ignoring the real structural problem: connective tissue.
I learned this lesson the hard way years ago. I followed a wing recipe that insisted 165°F was the magic number, so I smoked a batch until every wing hit it perfectly. On paper, everything looked right. The color was good, the smoke smelled great, and I was already imagining how good they were going to be.
Then I took a bite.
The skin stretched before it tore, almost like chewing on a rubber band. Instead of biting cleanly through, the entire piece of skin slid off the wing in one sheet. The meat was cooked and safe to eat, but the texture was disappointing.
At the time I thought I needed a better smoker or a different rub. What I eventually realized was that the recipe wasn’t accounting for collagen and fat rendering. Once I started cooking wings into the 175–180°F range and finishing them over higher heat, the difference was immediate. The skin finally bit cleanly, the fat rendered properly, and the wings ate the way smoked wings should.
If you want crispy smoked wings with real smoke flavor, here’s exactly how I do it.
The fix isn’t a new gadget or a secret rub. It’s a two-stage cook that separates smoke absorption from skin crisping. You run the wings low, around 225–250°F, to drive in wood flavor without burning the exterior.
Then you finish with high, direct heat (grill, broiler, or cranked smoker) to flash off surface moisture and trigger the Maillard reaction. This sequence works on a pellet grill, a ceramic kamado, a charcoal kettle, or a gas setup with a smoke tube.
The smoker type doesn’t matter; the temperature path does.
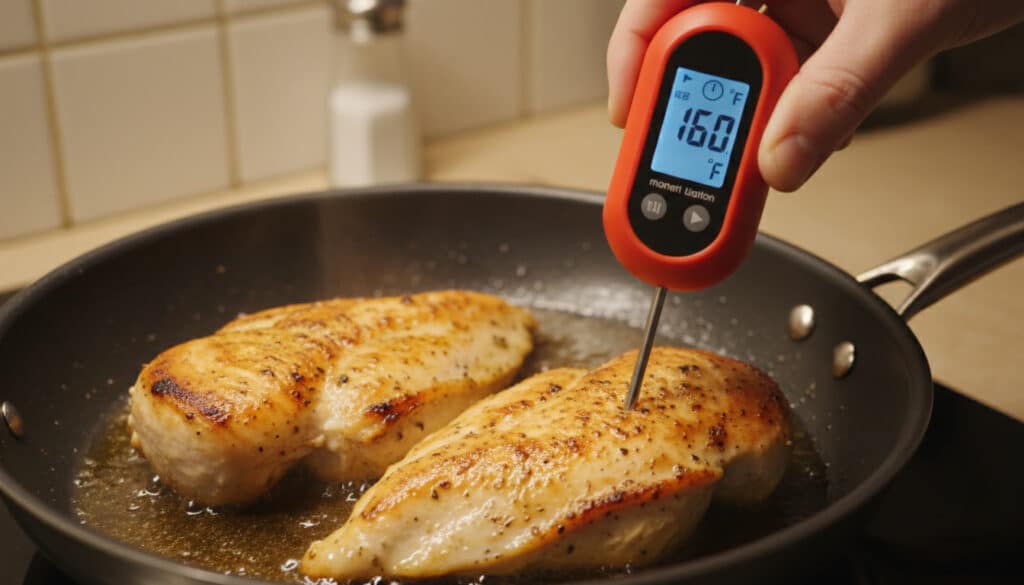
That path also means you stop checking for doneness at 165°F. You hold the wings in the 175–180°F zone long enough for collagen to give way and fat to render. The result is bite-through skin, a term you’ll hear pitmasters use for skin that snaps cleanly, not a rubbery chew.
USDA minimums guarantee safety, but they don’t guarantee texture. For wings, the real target is higher.
What You’ll Need:
Before the cook, you need the right ingredients and tools, starting with the one catalyst that makes crispy skin possible. Before we get into the cook itself, here are the ingredients and tools I use every time I make smoked wings. This section covers exactly what you need, and why the aluminium-free baking powder and a wire rack are the two pieces you cannot compromise on.
INGREDIENTS: WINGS, RUB, AND THE CRISPY-SKIN CATALYST:
The wing itself is straightforward: fresh or completely thawed party wings, or whole wings you separate yourself. Pat them ruthlessly dry with paper towels before anything touches the skin. Excess surface moisture is the enemy of dehydration.
For the dry-brine, you need two things: kosher salt and aluminium-free baking powder. The salt seasons the meat and draws out moisture. The baking powder is the non-negotiable.
Aluminium-free baking powder is the secret to crispy wings. It helps dry the skin and encourages better browning during the cook.
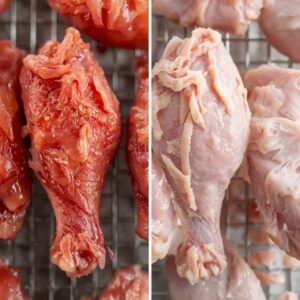
I’ve tried wings with just salt and wings with baking powder. The baking powder batch always comes out crispier.
Beyond the dry brine, you’ll want a dry rub for flavour. Apply it after the overnight dehydration or just before the smoker; either works. Choose a rub without sugar if you’re sensitive to burning during the high-heat finish, or one that’s gluten-free if needed.
A neutral oil spray (avocado or canola) is optional for the crisping stage, helping conduct heat directly to the skin. Sauce goes on after the cook: this section isn’t about sauce technique but have a vinegar-based or thin sauce ready if you plan to toss. Thick, sugary sauces can soften the skin you worked to crisp, so keep them light.
TOOLS AND THERMOMETERS:
You can run this method on any smoker, pellet, charcoal, kamado, or gas, but a few tools make the difference between guessing and knowing.
An instant-read thermometer is essential. You’ll use it twice: once during the low-and-slow smoke phase to track when the wings approach the collagen-rendering zone, and again during the high-heat finish to confirm you’ve hit 175–180°F in the thickest part of the drumette without going past it. That’s the window where connective tissue melts into gelatin, giving you bite-through skin instead of rubber. Hitting 165°F is safe; hitting 175°F is transformative.
The wire rack and sheet pan you’ll use for the dry-brine are just as critical. If you’ve ever dry-brined wings on a flat plate, you’ve seen the soggy underside: that’s moisture trapped against the skin, undoing the dehydration. The rack lifts each wing into open air so the skin dries evenly on all sides.
A pellet tube is worth having if you’re on a pellet or gas smoker. It’s a perforated metal tube you fill with wood pellets and light, adding a steady stream of supplemental smoke that these milder cookers often lack. Charcoal and stick-burner owners can skip it.
A high-heat grate or a set of grill grates that can handle direct searing is helpful for the final crisping step, especially if your smoker can’t reach high temps over indirect heat.
Finally, a couple of large mixing bowls let you toss the wings evenly with the baking powder and salt, and later with any dry rub.
The Crispy Skin Prep: The Overnight Dry-Brine:
With your ingredients assembled, the real work begins the night before: the dry-brine that separates crisp wings from rubbery ones.
EXPERT TIP Pat wings dry, coat with baking powder and salt, and rest uncovered on a wire rack in the fridge for 8 to 24 hours. This dehydration step is non-negotiable for bite-through skin. |

WHY WET MARINADES FIGHT AGAINST YOU:
Wet marinades promise flavor but sabotage texture. They flood the skin with surface moisture that must boil off before any browning can start. That delay leaves you with steamed, rubbery skin no matter how hot your smoker runs later.
A dry-brine does the opposite. Salt pulls moisture out of the skin and seasons the meat deeply. The skin dries, not the meat.
Start by patting the wings completely dry with paper towels. In a bowl, toss them with 1 teaspoon aluminum-free baking powder and 1/2 to 1 teaspoon kosher salt per pound of wings. Arrange the wings on a wire rack set over a sheet pan so air can circulate underneath. Slide the whole setup into the fridge, uncovered, for at least 8 hours, ideally 24.
Uncovered chilling dehydrates the skin significantly, starting the crisping process before a single flame is lit.
Which Temperature Should You Use?
Over the years I’ve settled on three temperature ranges depending on how much time I have and how much smoke flavour I want. Here’s a table that makes understanding the temperature ranges and their reason way easier.
SIDE-BY-SIDE COOK COMPARISON:
| Smoker Temperature | Approximate Time | Target Internal Temp | Skin Texture | Best Use Case |
|---|---|---|---|---|
|
225°F |
around 75–90 min (45–60 min smoke + high-heat finish) |
175–180°F |
Soft and rubbery without finish; crisp after high heat |
Maximum smoke flavor; you’re willing to run a two-stage cook |
|
250°F |
around 60–75 min (45–60 min smoke + brief high-heat bump) |
175–180°F |
Slightly firmer straight from the smoker; crisp with a short high-heat bump |
Pellet grill with a supplemental pellet tube; balance of smoke and texture without an oven finish |
|
350°F |
around 30–40 min (single stage) |
175–180°F |
Crisp directly, with less smoke penetration |
Time-saving cook when smoke flavor is secondary |
With your temperature path selected, it’s time to cook: low smoke for flavor, then high heat for the skin (or a single hot smoke if you chose the 350°F path).
The Full Cook: From Smoker to Plate
With your temperature path selected, it’s time to execute the two-stage cook: low smoke for flavor, then high heat for the skin.
PHASE 1: LOW SMOKE AND FLAVOR BUILD
Preheat your smoker to 225–250°F. If you are running a pellet grill or gas setup, place a pellet tube opposite the heat source now. Fill it with your chosen wood and light the end; it will smolder for 30–45 minutes, delivering dense smoke during the window when the meat is most receptive to flavor.
Arrange the wings skin-side up, leaving gaps between them for airflow. Leave a little space between the wings. If they’re piled together they’ll steam instead of smoke.
EXPERT TIP Keep the lid closed during the low-smoke phase: each opening drops the temperature and prolongs the time the skin spends in moisture-retaining conditions, undermining crispness. |
Let them ride for 45–60 minutes. At the end of this phase, the skin should feel dry and slightly tacky to the touch. If it still feels moist or looks slick, close the lid and give it another few minutes.
EXPERT TIP For low-and-slow paths, smoke at 225–250°F for 45–60 minutes to build flavor, then finish at 375–400°F or on a hot grill to crisp the skin: skipping the high-heat stage guarantees rubbery results. |
PHASE 2: THE HIGH-HEAT CRISPING FINISH
Transfer the wings to a zone preheated to 375–400°F or move them to a hot grill or a 425°F oven if your smoker cannot climb that high. The jump in temperature renders the remaining fat and collagen rapidly, creating the blistered surface that defines bite-through texture. You want a rapid sizzle, not a slow bake.
Before the wings hit the grates, brush them with a high-smoke-point oil like avocado or refined grapeseed. Trust me, few things are more frustrating than perfectly crisp skin sticking to the grill grates.
EXPERT TIP Brush the grill grate with high-smoke-point oil immediately before the high-heat finish to prevent the rendered skin from sticking and tearing. |
Watch for flare-ups. Dripping fat ignites easily at these temperatures, and charred rub tastes acrid, not caramelized. Keep the lid open if possible, or maintain strict ventilation control, rotating the wings every few minutes until the skin turns golden and taut.
VERIFYING DONENESS WITHOUT CUTTING
Probe the thickest part of a drumette, sliding the tip parallel to the bone to avoid hitting it. Pull the wings at 175–180°F, not the 165°F minimum.
Visual cues confirm the reading: the skin should show micro-blisters and a matte golden-brown finish, and the meat should begin pulling back from the ends of the bones. If you see these signs but the probe reads low, trust the texture and extend the cook a few minutes. Carryover heat will push the internal temp higher as they rest.
The wings are crisp and perfectly cooked. Now you face the final test: saucing without undoing all that texture work.
How to Sauce Without Ruining the Skin
The wings are crisp. Now you face the final test: saucing without undoing all that texture work.
THE RESTING RULE
Pull the wings from the high-heat phase and let them sit. Five minutes is the minimum.
During this window, the skin continues to firm as residual moisture evaporates and the protein structure sets. Sauce applied too early meets a porous, steam-laden surface. All that crisp skin you worked for starts softening almost immediately.
You cannot reverse this. Once the skin absorbs sauce moisture while hot, the texture shifts permanently from crisp to gummy.
EXPERT TIP Rest wings 5 minutes after the high-heat stage: this allows skin proteins to set and surface moisture to evaporate, preventing sauce from turning the skin gummy. Apply sauce only after crisping and resting. Coating hot, unrested wings traps steam and guarantees soggy skin. |
First-Hand Experience: Rested vs Immediate Saucing
I tested this by splitting a batch of wings in half. One tray went straight into sauce the moment it came off the grill. The second tray rested for five minutes before being tossed.
The difference was obvious almost immediately. The wings sauced right away lost their crispness within minutes. The skin softened and the crunch disappeared.
The rested wings held their texture noticeably longer. When you bit into them, you could actually hear the skin crack before giving way to the meat. That small five-minute pause felt insignificant at first, but after repeating the test several times it’s become a permanent step in my process.
THE SAUCING SEQUENCE
Once rested, transfer the wings to a large bowl. Add your sauce and toss thoroughly, but quickly. Every second counts here. The goal is even coating before the skin begins to soften.
With a sugary glaze, you have one more step. Return the sauced wings to the grill over high heat for two to three minutes. This flash sets the glaze, creating a lacquered exterior without pushing the sugars into burnt territory.
Stay close. Two minutes transforms into carbon fast. Watch for bubbling and slight darkening at the edges, then pull immediately.
EXPERT TIP For sugary glazes, return sauced wings to high heat for no more than 2-3 minutes to caramelize the sugars without burning; any longer and the sugars will blacken. |
WET VS. DRY FINISHES
Choose your finish based on your serving timeline. A dry finish, dusting the rested wings with additional rub, preserves maximum crispness for extended periods. This is your move for parties, tailgates, or meal prep where wings might sit for twenty minutes or more. The dry coating adheres to the dehydrated surface without introducing moisture. Apply the dusting while the wings are still warm to help the spices bloom and stick.
Wet sauces demand immediate consumption. If you must sauce, thinner vinegar-based options penetrate less and evaporate faster than thick, ketchup-heavy blends. They offer flavor contrast without the same moisture penalty.
Thick, sugary sauces look glossy but saturate the skin fastest, shortening your serving window to minutes, not quarters of an hour. When feeding a crowd, serve sauce on the side. Let guests dip as they eat. This keeps the skin intact and puts the texture decision in their hands.
Every smoker behaves differently. The next section adapts the method to your specific rig, whether pellet, charcoal, kamado, or gas.
Wood Pairing and Smoke Management
Smoke quality matters as much as temperature. The right wood and clean combustion keep bitterness off your wings. The right wood creates depth and balance. The wrong smoke can leave wings tasting bitter no matter how well they’re cooked.
Best Woods for Smoked Chicken Wings
Apple:
Apple wood is my default recommendation for beginners. It produces a mild, slightly sweet smoke that complements chicken without overpowering it.
Best for:
- Buffalo wings
- Garlic parmesan wings
- Family-friendly cooks
Cherry:
Cherry creates a beautiful reddish-brown color and a slightly richer smoke profile than apple.
Best for:
- Dry-rub wings
- BBQ-style wings
- Competition-style presentation
Pecan:
Pecan sits between fruit woods and hickory. It adds a deeper, nuttier flavor while remaining balanced.
Best for:
- Texas-style wings
- Pepper-heavy rubs
- Longer smoke sessions
Hickory:
Hickory delivers the strongest smoke flavor I’d recommend for wings. Used carefully, it produces outstanding results.
Best for:
- Bold BBQ flavors
- Dry-rub wings
- Experienced pitmasters
Avoid using too much hickory on smaller wing cooks. The meat is thin and can absorb smoke quickly.
Avoid Thick White Smoke
One of the biggest mistakes new pitmasters make is chasing more smoke.
You don’t want clouds of thick white smoke pouring from the smoker.
You want thin blue smoke.
Heavy white smoke contains unburned compounds that leave a bitter, harsh flavor on the skin. Thin blue smoke burns cleaner and produces a much more pleasant flavor.
Signs of Clean Combustion
- Smoke appears light blue or nearly invisible
- Fire burns steadily
- Smoke smells sweet and woody
- No sharp or acrid smell
Signs of Dirty Smoke
- Thick white clouds
- Sharp or bitter smell
- Soot accumulation
- Bitter skin or bark
If you’re using a pellet smoker, vacuum ash regularly and keep the fire pot clean. On charcoal smokers, allow the charcoal to fully ignite before adding food. Clean combustion matters more than smoke quantity.
My Go-To Combination
For most chicken wing cooks, I use cherry and pecan together. Cherry gives great color while pecan adds enough depth to taste like barbecue without overwhelming the chicken. If I’m cooking for friends, cherry and pecan is hard to mess up and works with almost any wing sauce.
The Crispy Skin Troubleshooter
Even with perfect technique, things go wrong. A pit temp spike, a gust of wind, or a simple oversight can leave you with rubbery skin or acrid bark. This troubleshooter diagnoses the five most common failures and gives you immediate, actionable fixes. No guesswork, no wasted cooks.
DIAGNOSTIC BOX: MATCH THE FAILURE TO THE FIX
| Failure | Root Cause | Corrective Action |
|---|---|---|
|
Rubbery skin |
Pulled too early or didn’t get enough high heat: pit temp too low or phase too short |
Extend the low-temp smoke phase or continue the high-heat finish until wings reach 175–180°F internal until skin probes like softened butter |
|
Bitter bark |
Excessive smoke or dirty combustion (acrid white smoke) |
Reduce smoke time, switch to cleaner-burning fuel, or ensure thin blue smoke before adding wings |
|
Weak smoke |
Skin wasn’t dry enough before smoking; dry-brine or alkaline coating skipped |
Always dry-brine and coat with baking powder to create a tacky surface that grabs smoke |
|
Burnt sugar |
Sauce or sugary rub applied too early in the cook |
Apply sauce only after the high-heat crisping phase; use low-sugar rubs if saucing early |
|
Flare-ups |
Rendered fat dripping onto heat source during high-heat phase |
Place a drip pan beneath the wings or move to an indirect zone when cranking heat |
SCALING FOR PARTIES AND BATCH MANAGEMENT
If you’re feeding a crowd, timing is everything. Start the dry-brine the night before so every wing is ready to go when the smoker is. Smoke in batches if your grate space is tight, but finish all the wings before you sauce a single one.
As each batch comes off the smoker, set the wings on a wire rack over a sheet pan and hold them in a 170°F oven. The rack keeps air moving around the skin, so it stays crisp. Direct contact with a pan or foil steams the bottom and ruins the texture you just built. The low oven temperature won’t cook the meat further, but it will keep everything hot for up to an hour.
Sauce only the wings hitting the table right now. Toss a portion in sauce, plate it, and serve. Then sauce the next round. Holding sauced wings, even in a warm oven, softens the skin and dilutes the smoke character you worked for. A dry wing can wait; a sauced one cannot.
Pitmaster Perspective:
“When I’m cooking fifty wings on my 22-inch kettle, I don’t try to finish everything at the exact same second. I smoke in batches and hold finished wings on wire racks in a 170°F oven while the next batch cooks. The rack is important because it keeps air moving around the wings. As long as they stay elevated, they’ll hold crispness surprisingly well. What I never do is sauce them ahead of time. Sauce goes on right before serving.”
— Advice shared by a longtime kettle-cooker during a local Texas barbecue gathering
FAQs:
Why are my smoked chicken wings always rubbery?
Rubbery wings are usually caused by pulling them at 165°F, which is safe but doesn’t fully render collagen and fat. For bite-through skin, you need to cook wings to 175-180°F and use a two-stage cook with a dry-brine.
Do I really need baking powder for crispy wings?
Yes, aluminum-free baking powder is essential. It raises the skin’s pH, accelerating browning and creating micro-blisters for crispness. Cornstarch or other substitutes won’t produce the same effect.
How do I sauce smoked wings without ruining the crispiness?
Rest the wings for 5 minutes after cooking, then sauce quickly. For sugary glazes, return them to high heat for 2-3 minutes to set. Serve wet sauces immediately, or offer sauce on the side to preserve crispness.
What temperature should I smoke wings at?
Use a two-stage approach: smoke at 225-250°F for 45-60 minutes to build flavor, then finish at high heat (375-400°F or on a hot grill) to crisp the skin. A single-stage 350°F cook works if smoke is secondary.
Can I use cornstarch instead of baking powder in the dry-brine?
No. Cornstarch helps dry the surface but doesn’t create the same crispy texture as baking powder.
Crispy Smoked Chicken Wings
Ingredients
- Wings
- 2 pounds chicken wings
- 2 tsp kosher salt
- 2 tsp aluminum-free baking powder
- Rub
- 1 tbsp paprika
- 1 tsp garlic powder
- 1 tsp onion powder
- 1 tsp black pepper
- ½ tsp cayenne pepper optional
- Optional
- Buffalo sauce
- BBQ sauce
- Garlic parmesan sauce
Instructions
- Pat the wings completely dry.
- Toss with kosher salt and aluminum-free baking powder.
- Place on a wire rack and refrigerate uncovered for 8–24 hours.
- Preheat smoker to 225–250°F.
- Smoke wings for 45–60 minutes.
- Increase heat to 375–400°F or move wings to a hot grill.
- Cook until wings reach 175–180°F internal temperature.
- Rest for 5 minutes.
- Toss with sauce or additional dry rub.
- Serve immediately.
Notes
- Aluminum-free baking powder produces the best skin texture.
- Do not pull wings at 165°F if texture is your goal.
- For maximum smoke flavor, use cherry and pecan wood.
- Sauce only after resting.